Configure Destination- File System
Step 1: Click the Configure Button in the upper right-hand corner beside the Destination Icon.

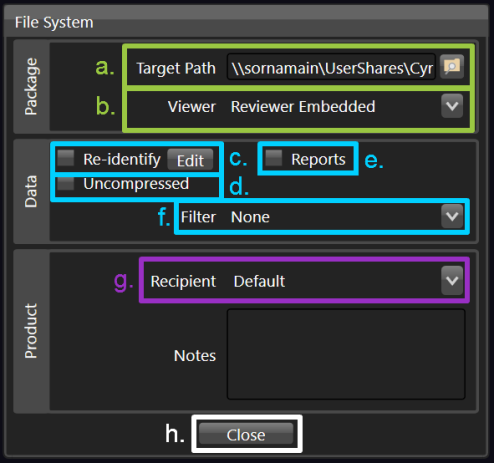
Step 2: The Configure File System Window appears, and each configuration setting is displayed within it. Below is a full view of the Configure File System Window, followed by a key for each labeled section.

a. Target Path
Click the browse icon to select the file path for the destination of your job .
b. Viewer
Click the Viewer dropdown to select the desired viewer to embed on the File System from a predefined list set by your facility’s systems administrator.
c. Re-identify
Re-identify, or manually anonymize and / or correct patient information.
Learn more: Re-identify
d. Uncompressed
Left unchecked, the data sent to the File System is left in its original state.
e. Reports
Click the Reports checkbox to include reports on the File System.
f. Filter
Click the Filter dropdown to select a filter option.
Each filter option is predefined by your facility’s systems administrator and is configured to exclude specific series’ (may exclude one or more series).
g. Recipient
Click the Recipient dropdown to select a recipient from a predefined list set by your facility’s systems administrator.
Lean more: Recipient Encryption
Notes
Manually entered notes will only appear in Job History in Vertex.
i. Close
Upon completion of selection / entry of all configuration settings, click the Close button to exit.
